How to Create a System Generated Accounts Receivable Invoice (ARS) in MIP
When the Accounts Receivable Billing Module is owned, it allows the user to create, print, and email the actual AR invoice to the customer. Without it, the user can only enter manual AR invoices, ARB’s into MIP. Those entries are restricted to just the accounting debits and credits, and the invoice cannot be printed or emailed to the customer.
The steps below outline how to create a system-generated AR invoice through in MIP.
Step 1: Enter Charges – Entering charges is the foundation of the AR invoice, and that is why it is the first step.
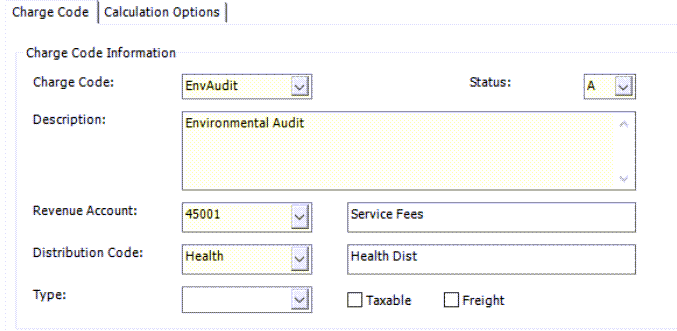
To create charge codes, the user can navigate to Maintain > Accounts Receivable > Charge Codes. The charge code will be associated with a specific Revenue Code, along with specific Distribution Code.
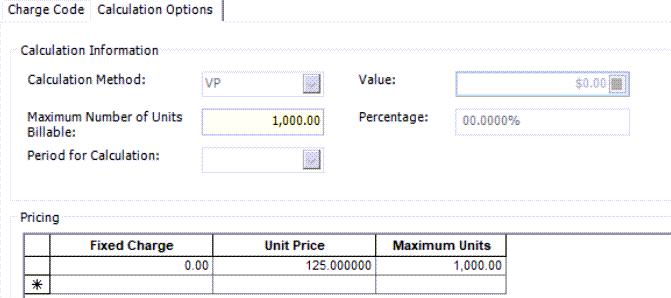
These two options allow MIP to create system-generated accounting transactions later in the process. The user can then designate the Calculation Options of that charge code and Save. Once charge codes are created, the user can then begin to enter charges.
Navigate to Activities > Accounts Receivable > Enter Charges
There are three types of charges that can be created while entering charges:
- One-time Charges: the user will enter the charges manually each time using existing charge codes
- Recurring Charges: the user can enter the manual charge and then check the box for Recurring. This will keep the charge active for future use.
- Default Changes: These can be assigned to Billing Groups within MIP. Billing Groups can be set up under Maintain > Accounts Receivable > Billing Groups. Customers can be placed in Billing Groups, and those groups can then be associated with default charges. These charges will always apply to the customers in those billing groups.
Step 2: Calculate Invoices – Once the charges have been entered, either through manual one-time charges, recurring charges, or default charges on billing groups, the invoices can then be calculated.
Navigate to Activities > Accounts Receivable > Calculate Invoices
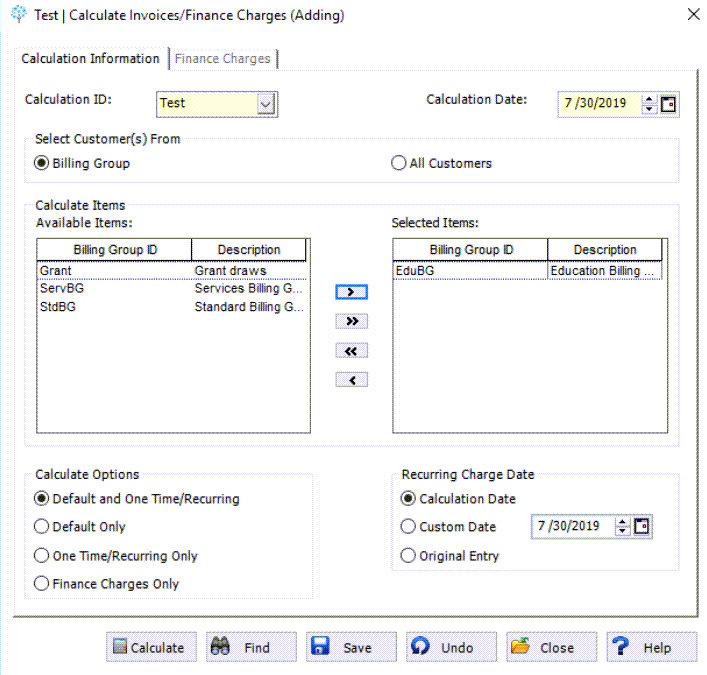
Enter in a new Calculation ID or re-use an existing Calculation ID and edit it if need be. Users can select customers from a Billing Group or choose “All Customers” and pick and choose the customers they want to calculate for individually. Choose the Calculation Options that fits the situation, however “Default and One Time/Recurring” will pick all up charges entered. Finally, choose a Calculation Date and hit Calculate.
Step 3: Review Invoices – Once the invoices have been calculated, using the charges that were entered, they can be reviewed for accuracy before continuing.
Navigate to Activities > Accounts Receivable > Review/Modify Invoices
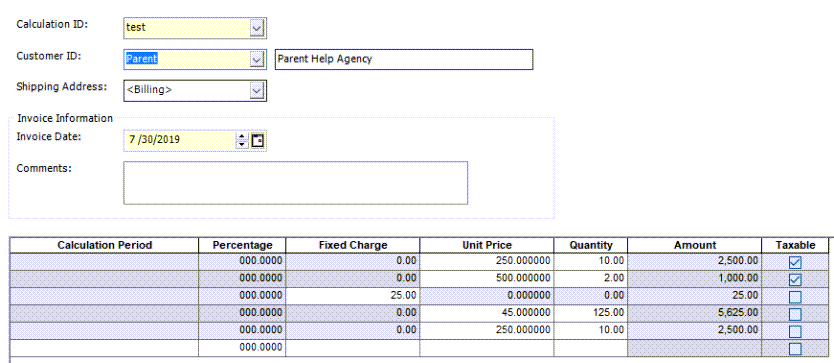
The user can then enter the information, such as Calculation ID and Customer ID, to review the invoice’s calculated information and amounts. Once the invoices have been reviewed for accuracy, they can then be printed in the next step.
Step 4: Print/Email Calculated Invoices
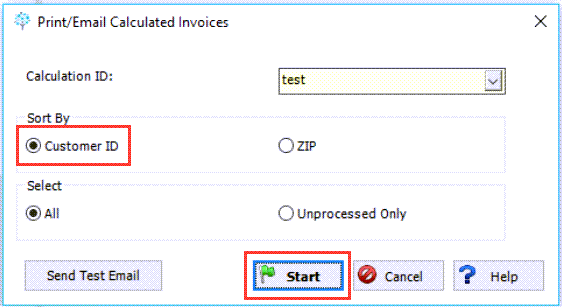
Navigate to Activities > Accounts Receivable > Print/Email Calculated Invoices
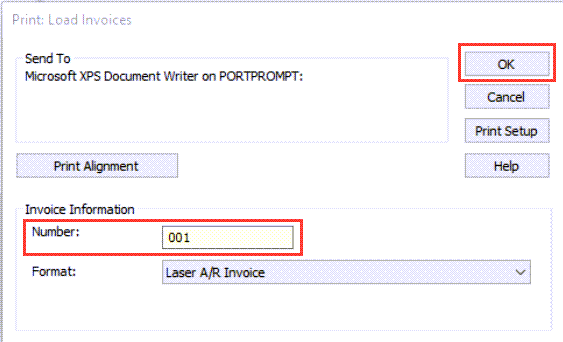
Choose the Calculated ID and hit Start. Choose the printer that will be used, and enter the starting Invoice Number, followed by the format that will be used. Once those choices are picked, hit OK.
Step 5: Create Transactions
When the AR Billing Module is utilized, and a system-generated AR invoice is created, the MIP Fund Accounting software creates the accounting transactions for the user. When an AR invoice is entered manually, the user enters the debits and credits manually. Here, MIP will create the transactions for the user automatically, using the offset account assignments that have been set up.
For example, the charge code that is used in the invoice is associated with a revenue GL code as well as a distribution code. This provides MIP with the “credit to revenue” side of the invoice, so MIP will then create the “debit to AR’ based on that offset account assignment. If the charge code references Revenue code “12000” and the distribution code used references the Fund code “001”, that is what will be entered to make sure the offset to AR exists.
To investigate the offsets: Navigate to Maintain > Offset Account Assignments. Choose transaction source: AR Invoice and then populate the “Transaction Entry Accounts” fields with the information for the “credit to revenue” side. In our example, we need to ensure our offset is set up for Fund: 001 and GL code: 12000. This will then show the offset to the same fund and an offset to an AR account. Once this is complete, you can create your AR invoice accounting transactions.
Navigate to activities > Accounts Receivable > create Transactions
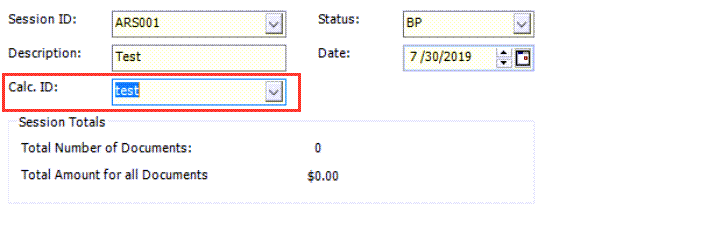
Enter a new Session ID and choose the Calculation ID used in the previous steps. Once complete, hit Start. This creates accounting transactions, debits, and credits, and they can also be reviewed in the next step.
Step 6: Edit Unposted Invoices
Navigate to Transactions > Accounts Receivable > Edit A/R Invoices
Here, the user can review the unposted Session ID for their AR invoices. The debits and credits can be reviewed for accuracy, along with the segment coding that was created by the MIP Software, based on the charge codes, distribution codes, and offset account assignments.
Once all invoices have been reviewed for accuracy, Navigate to Activities > Manage Sessions > Post Transactions and post the AR invoice Session ID.
Register for our MIP Fund Accounting newsletter today!
If you need assistance with your MIP Fund Accounting software or have additional questions, please contact our MIP support team at 260.423.2414.
Copyright 2023 DWD Technology Group | All rights reserved. This article content may not be reproduced (in whole or in part), displayed, modified or distributed without express permission from the copyright holder.

