It’s time to minimize the physical checks that you print.
Are you looking to minimize the physical checks that you print – especially to help prevent fraud on your bank account? Setting up Direct Deposit to pay your employees is not a difficult thing at all to do. Besides not having to worry about “the dog eating the paycheck”, employees can get their money more quickly, and there’s less likelihood of fraudulent checks getting cashed because your bank account number is not in circulation with Direct Deposit.
Some setup is required, but once configured, paying your employees becomes much easier.
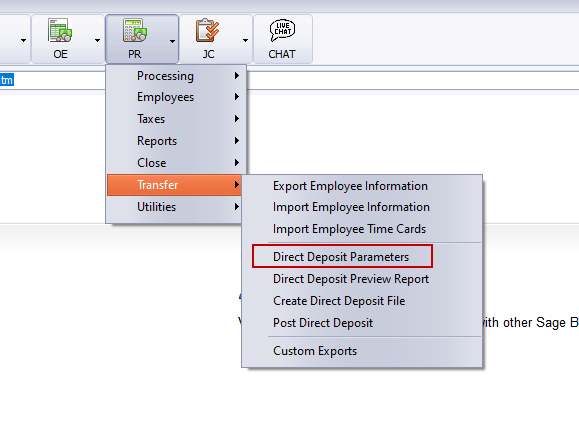
First, you need to configure your bank to be able to generate the Direct Deposit Transmittal File. Under Payroll > Transfer > Direct Deposit Parameters, you can setup some of the key information that will go into the Transmittal File.
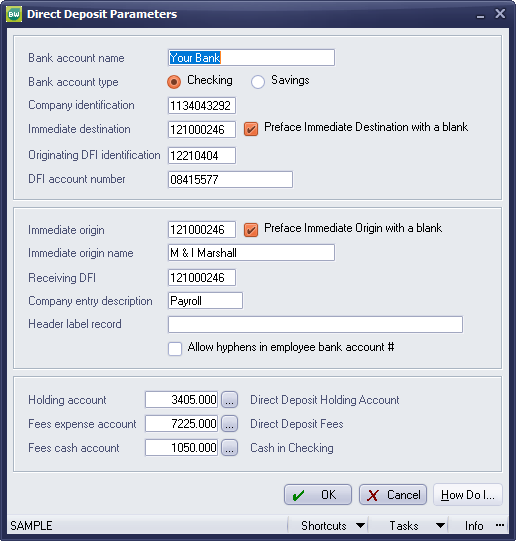
The settings you configure here are for the bank account you will use with Payroll. Based on the criteria for your bank, you will need to define information specific to how they need your NACHA file configured.
- Bank Account Name – if your bank has specific information required, fill that in here
- Bank Account Type – some banks require that you define exactly whether this is a checking or a savings account
- Company Identification – typically your Federal Employer ID Number
- Immediate Destination – often this is your bank’s Routing/Transit Number, but it may be something else specified by your bank (nine digits if the Preface Immediate Destination with a blank is selected; ten digits otherwise)
- Originating DFI Identification – again, often the bank Routing/Transit Number, but it may also be something else specified by your bank
- DFI Account Number – this is typically your actual bank Account Number
- Immediate Origin – typically your bank Routing Number (nine digits if the Preface Immediate Origin with a blank is selected; ten digits otherwise)
- Immediate Origin Name – often your bank Name, unless otherwise specified
- Receiving DFI – this is a Routing/Transit Number of the receiving Depository Financial Institution, if it is different than the Immediate Origin
- Company Entry Description – text specified by your bank to indicate the type of transmittal
- Header Label Record – only used for magnetic tape filers. This may be left blank
- Allow Hyphens in Employee Bank Account # – if your bank allows hyphens in the transmittal file. If this checkbox is cleared, when the NACHA file gets created, any hyphens in the employee data will get removed
- Holding Account – this is a temporary “Cash Clearing” account which holds the payroll funds until you actually post the Direct Deposit
- Fees Expense Account – account where you can specify fees of which you are aware at the time you post the Direct Deposit
- Fees Cash Account – account to be credited to balance the Fees Expense when posting Direct Deposit
Now that the bank is configured to be able to process Direct Deposit, employees need to be configured to receive their pay. Payroll > Employees > Maintain Employees
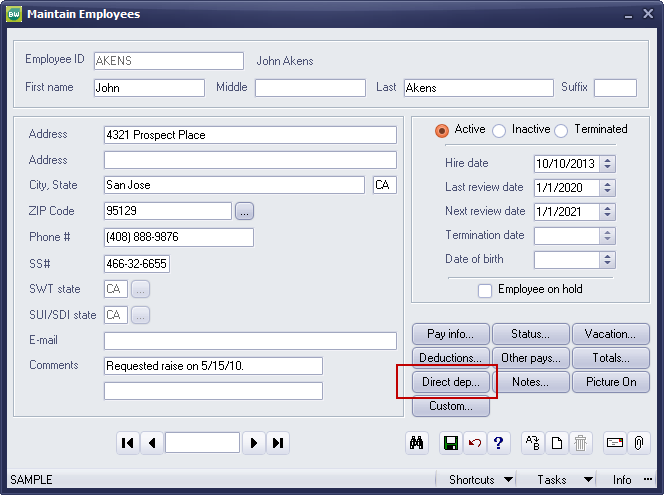
You may configure multiple bank accounts into which employees’ pay can be deposited. The basic rule, however, is that the last bank specified should be Percent of Net at 100%. This only means that after other bank accounts have been specified, whatever is left over goes into the last account.
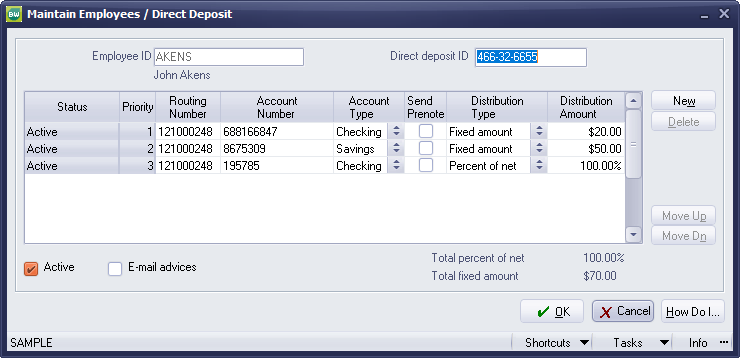
- Employee ID – non-editable as this is the BW employee ID
- Direct Deposit ID – this could be the employee SSN or some other ID you wish to specify
- Status – indicates whether or not the bank account is enabled to receive funds
- Priority – order in which funds will be deposited
- Routing Number – employee’s bank’s Routing/Transit Number
- Account Number – employee’s bank Account Number
- Account Type – checking or savings
- Send Prenote – enable this checkbox in order to process a Prenote on this account
- Distribution Type – Fixed Amount (flat dollar) or Percent of Net (remember that the LAST account MUST be 100%, regardless of any other percentages specified on other accounts)
- Distribution Amount – the flat amount or the percentage of pay to be distributed to that account
Once your bank and employee bank information have all be configured, you can process payroll and generate the transmittal file. Payroll processes no differently, except when it comes time to print paychecks/direct deposit stubs. You can opt to print checks separately from Direct Deposit Stubs.
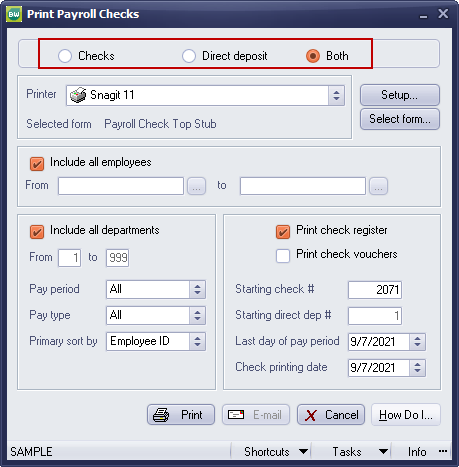
If you print “Both” Checks and Direct Deposit Stubs at the same time, they will follow the Payroll Check format. They will also consume check numbers. If you print Checks and Direct Deposit Stubs separately, you use a different format and numbering sequence than the physical checks.
After printing the Direct Deposit Stubs, there are two more steps necessary. First, you need to create the transmittal file.
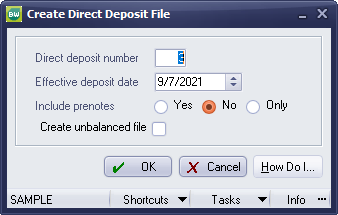
The file, BWPAYDDCOMPANYID.nnn, is created and stored in a Sage BusinessWorks directory (for example, C:\Program Files\Common\Sage BusinessWorks\BWPAYDDCOMPANYID.289). The value for COMPANYID is replaced by the current company ID. The “nnn” extension is a three-digit number between 1 and 999 that helps to keep track of the file.
You will need to create the transmittal file that gets sent to the bank (PR > Transfer > Create Direct Deposit File.) Work with your bank to determine the steps necessary to upload this file. Your final step will be to create the transaction that will post the actual cash disbursement and record any fees. Go to PR > Transfer > Post Direct Deposit.
Then, to finish processing, you need to Post Direct Deposit. This moves the money from the holding account to the actual cash account and also allows fees to be recorded for processing Direct Deposit with your bank. Go to PR > Transfer > Post Direct Deposit.
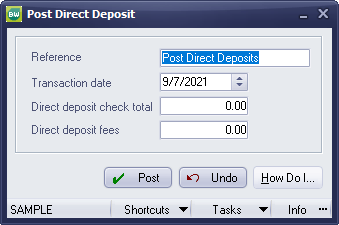
Specify the proper pay date and any fees to be posted at the time of transmittal.
Make sure to specify the Direct deposit check total, as this will credit your payroll cash account and debit the holding account to clear it out.
Processing payroll via Direct Deposit is not difficult, and it can help eliminate fraud and lost paychecks. Your employees can receive their funds more quickly than having to cash a check at their banks.
If you have questions or need assistance with your Sage BusinessWorks software, please contact our BusinessWorks support team at 260.423.2414.
Register for our Sage BusinessWorks newsletter today!
Copyright 2021 DWD Technology Group | All rights reserved. This article content may not be reproduced (in whole or in part), displayed, modified or distributed without express permission from the copyright holder.

